
Configuring a Proxy Server
The following sections describe how to build and configure a proxy server.
Click here for the video tutorial on configuring a proxy server.
A proxy server allows Lucidum connectors that run on your SaaS account to fetch data securely from your on-premises assets.

Deploy and Prep the Virtual Machine or Server
The proxy server must meet these requirements:
Choose an internal Linux server to use as a proxy.
You can choose any Linux distribution that supports Docker.
Server must use Intel x86 based processor.
Server must have at least 1 GB of free disk space.
Server must have at least 1 GB of RAM dedicated to the tunnel container.
Configuring DNS resolution (see: https://linuxconfig.org/linux-dns-server-bind-configuration)
Configure NTP sync. (see: https://linuxconfig.org/stay-time-synchronized-with-internet-time-server )
On this internal Linux server, install docker. For step-by-step details, see the section “Install using the repository” at this link: https://docs.docker.com/engine/install/ubuntu/.
Example

•Server is AWS t2.micro (free tier)
•1GB memory
•16GB storage
•64-bit (required for Docker)
•Ubuntu 22.04 (LTS preferred for support)
Validate Network Connectivity
Use the following sections to validate network connectivity on the proxy server.
Update Linux Packages
After configuring Linux on the proxy server, best practice is to update all packages. To do this:
Either log in to the console of the proxy server or use SSH to access the server.
On the proxy server, open a shell session.
At the shell prompt, type:
sudo apt update
sudo apt upgrade -y
These commands not only update the packages on the new server but also test internet connectivity and DNS resolution.
Check NTP Connection
After configuring Linux on the proxy server, check the NTP connection. To do this:
Either log in to the console of the proxy server or use SSH to access the server.
On the proxy server, open a shell session.
To check the NTP source, at the shell prompt, type:
chronyc sourcesTo check the health of the system clock, at the shell prompt, type:
chronyc tracking
Check Lucidum Tunnel Connection
The proxy server must have network connectivity to the Lucidum appliance via outbound port 1194.
To test this connectivity:
Either log in to the console of the proxy server or use SSH to access the server.
On the proxy server, open a shell session.
To check the tunnel connection at port 1194, at the shell prompt, type:
nmap -Pn -p 1194 tunnel.[fully qualified domain name]where:
fully qualified domain name is the fully qualified domain name of the Lucidum SaaS instance. Usually the fqdn is <customer_name>.lucidum.cloud
To view the fully qualified domain name of the Lucidum SaaS instance, you can view the contents of the client.conf file that Lucidum sends you. To do so:
cat client.conf
The nmap command validates that the TCP port 1194 is open outbound from the proxy server and open inbound on the Lucidum SaaS instance.
Install and Configure Docker
The proxy server requires Docker. To install and configure Docker:
Either log in to the console of the proxy server or use SSH to access the server.
On the proxy server, open a shell session.
Create a user called “lucidum”. To do this, at the shell prompt, type:
sudo adduser lucidumMake note of the password you created for “lucidum”.
Add lucidum user to the admin group. This allows lucidum to use sudo commands. At the shell prompt, type:
sudo usermod –a –G admin lucidumInstall docker. For details on installing Docker on all Linux operating systems, see https://docs.docker.com/engine/install/
In our example, we will install Docker on Ubuntu and install from repository. For details, see https://docs.docker.com/engine/install/ubuntu/
Set up the repository
Install the Docker engine
Create a “docker” group. At the shell prompt, type:
sudo groupadd dockerAdd the “lucidum” user to the “docker” group. This allows lucidum to run docker commands. At the shell prompt, type:
sudo usermod –a –G docker lucidumTo force the proxy server to read the group memberships, log out of the proxy server and log back in.
Copy client.conf to the Proxy Server
To create the proxy server, Lucidum supplies a file called client.conf.
Login to your Lucidum system.
Go to Settings > Tunnel Proxy Settings.
In the Tunnel Proxy Settings page, click the Download (down arrow) icon.
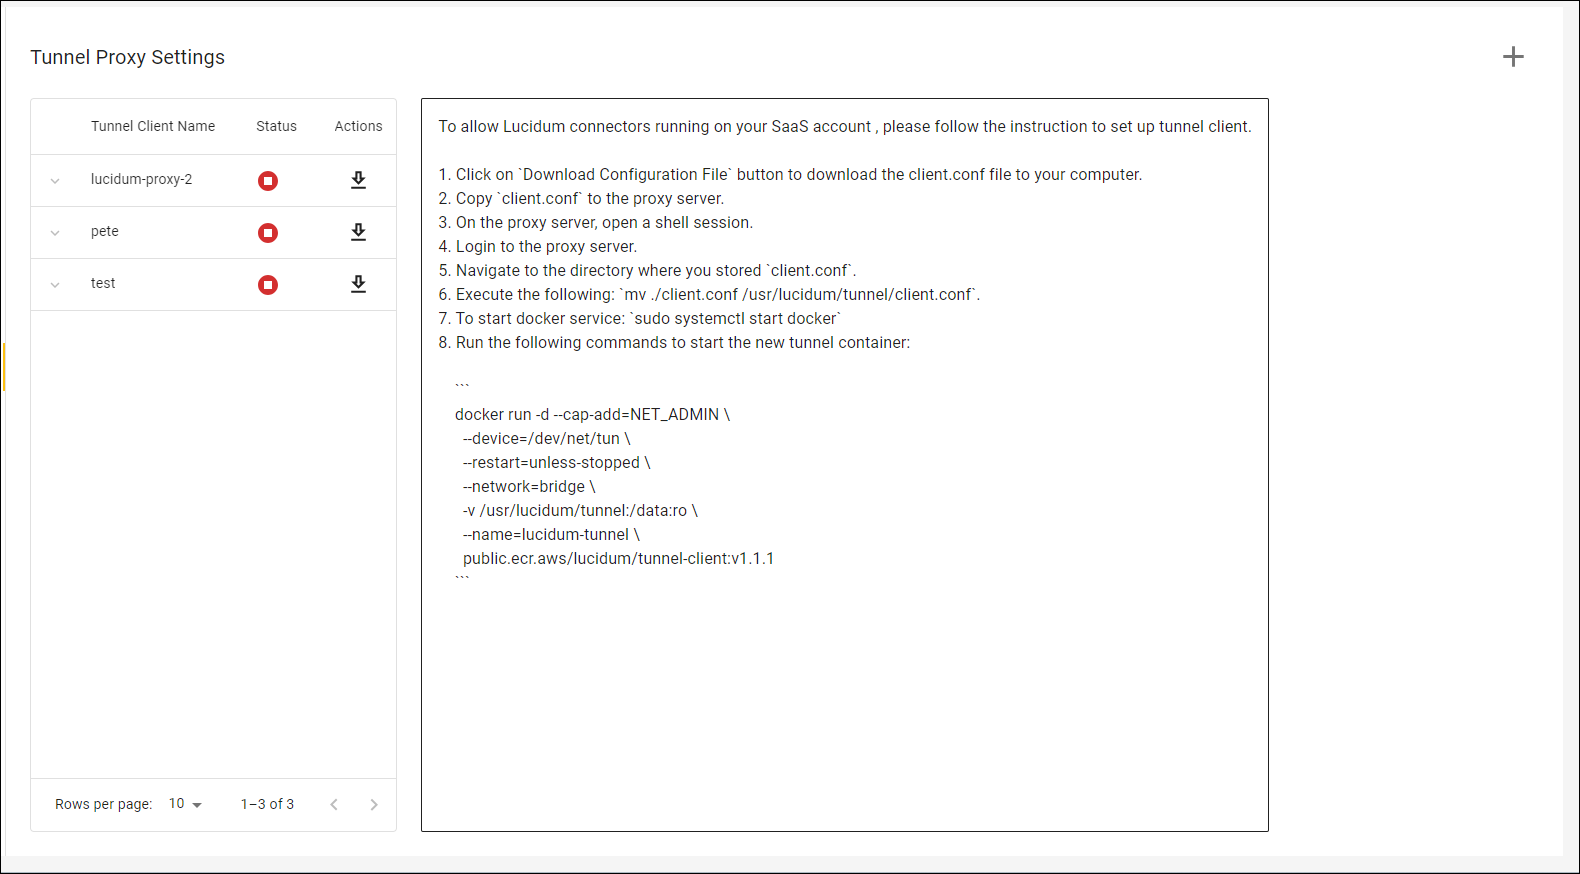
In the Tunnel Proxy Settings page, click the Download (down arrow) icon.
Lucidum will download a file named client.conf to your local computer.
The client.conf file includes:
FQDN and port for the tunnel endpoint
Keys
TLS certs
Either log in to the console of the proxy server or use SSH to access the server.
Using a tool like WinSCP or FTP, copy client.conf to your home directory on the proxy server.
On the proxy server, open a shell session.
Create the directory /usr/lucidum/tunnel. To do this, at the shell prompt, type:
mkdir -p /usr/lucidum/tunnelNavigate to the directory where you stored client.conf.
Copy client.conf to the directory /usr/lucidum/tunnel. To do this, at the shell prompt, type:
sudo cp ./client.conf /usr/lucidum/tunnelMake the directory that contains client.conf read-only. To do this, at the shell prompt, type:
chmod a=r /usr/lucidum/tunnel
Start Docker and Run the Docker Image
Next, you must start docker and run the docker image.
On the proxy server, login as user “lucidum”. Either log in to the console of the proxy server or use SSH to access the server.
On the proxy server, open a shell session.
See if Docker is running. To do this, at the shell prompt, type:
docker psIf you see the message “Cannot connect to Docker daemon…”, you must start Docker.
Start Docker. To do this, at the shell prompt, type:
sudo systemctl start dockerSee if Docker is running. To do this, at the shell prompt, type:
docker psStart the new Docker container. To do this, at the shell prompt, type:
docker run -d --cap-add=NET_ADMIN \--device=/dev/net/tun \--restart=unless-stopped \--network=bridge \-v /usr/lucidum/tunnel:/data \--name=lucidum-tunnel \public.ecr.aws/lucidum/tunnel-client:v1.1.2NOTE: If you are using Red Hat Enterprise Linux, you must add an additional line to start the Docker container. Use this script and note the additional line that begins with “--unlimit”.
docker run -d --cap-add=NET_ADMIN \--device=/dev/net/tun \--restart=unless-stopped \--network=bridge \-v /usr/lucidum/tunnel:/data \--name=lucidum-tunnel \--ulimit nofile=1048576:1048576 \public.ecr.aws/lucidum/tunnel-client:v1.1.2When you have completed configuration on your proxy server and on your Lucidum system, contact Lucidum Customer Success to test your connection and help you troubleshoot if necessary.
Verify Tunnel Connection
To view the logs for the tunnel connection between Lucidum and the proxy server:
On the proxy server, login as user “lucidum”. Either log in to the console of the proxy server or use SSH to access the server.
On the proxy server, open a shell session.
View the logs for the tunnel connection. To do this, at the shell prompt, type:
docker logs lucidum-tunnelThe log should look something like this:

Configuring Connectors to Use the Proxy Server
Navigate to the Lucidum UI
In the left pane, click the Connectors icon.
In the Connectors page, you can view the list of connectors.
Look for the connector in the Errors, Disabled, or Enabled category. These are connectors that have already been configured.
In the Settings page, scroll down the field in the right pane. If the connector supports a proxy, it will include the Proxy field.
Enter the following in the Proxy field:
192.168.255.6:3128
This is the IP address and port number of the proxy service inside the docker container on the proxy server.
Note that this IP value appeared in the log file in the section above.