
Overview of Actions
What Are Actions?
Lucidum includes a feature called Actions. Actions are automations that are triggered by query results.
Actions include sending email messages, posting a message to slack, creating tickets, isolating infected devices, or making changes to Active Directory, among other options.
For example, you can define an action that sends an email to the IT team if Lucidum discovers one or more assets without endpoint protection.
Lucidum also includes a type of action for webhooks. For details on webhooks, see the manual Using Webhooks in Lucidum.
Structure of Actions
Actions include two pieces
A configuration that provides the connection and authorization information to communicate with the external solution.
An action that specifies the task to execute, the data to include in the action, and how frequently to execute the action.
List of Actions
Actions for Active Directory
Lucidum includes the following Actions for Active Directory:
Change Computer Group. Changes the AD group membership for one or more assets.
Disable Computer. Disables one or more computer objects in AD. When a computer object is disabled in AD, domain accounts cannot log in to the computer.
Enable Computer. Enables one or more computer objects in AD. When a computer object is enabled in AD, domain accounts can log in to the computer.
Change Computer OU. Changes the AD OU (organizational unit) for one or more computers.
Change User Group. Changes the AD group membership for one or more users.
Disable User. Disables one or more user objects in AD. When a user object is disabled in AD, the user cannot log in to the domain.
Enable User. Enables one or more user objects in AD. When a user object is enabled in AD, the user can log in to the domain.
Change User OU. Changes the AD OU (organizational unit) for one or more users.
Actions for AWS EC2
Lucidum includes the following Actions for AWS EC2:
Stop Instance. Stops one or more AWS instances. For details on what happens when you stop an AWS instance, see https://docs.aws.amazon.com/AWSEC2/latest/UserGuide/Stop_Start.html#what-happens-stop/.
Start Instance. Starts one or more previously stopped AWS instances. For details on what happens when you start an AWS instance, see https://docs.aws.amazon.com/AWSEC2/latest/UserGuide/Stop_Start.html#what-happens-start/.
Tag Instance. Adds a tag (descriptive key: value pair) to one or more AWS instances. For details on tagging, see https://docs.aws.amazon.com/AWSEC2/latest/UserGuide/Using_Tags.html .
Untag Instance. Removes a tag (descriptive key: value pair) from one or more AWS instances. For details on tagging, see https://docs.aws.amazon.com/AWSEC2/latest/UserGuide/Using_Tags.html .
Actions for Automox
Lucidum includes the following Actions for Automox:
Patch Device. Applies all available software patches to one or more devices.
Reboot Device. Reboots one or more devices.
Actions for CrowdStrike Falcon LogScale
Lucidum includes the following Actions for Crowdstrike Falcon LogScale:
Send Data to LogScale. Sends a custom set of Lucidum data to LogScale.
Actions for Elastic Cloud
Lucidum includes the following Actions for Elastic Cloud:
Send to Elastic Cloud Index. Sends a custom set of Lucidum data to Elastic Cloud.
Actions for Email
Lucidum includes the following Actions for Email:
Send Email. Sends data about one or more assets or users to one or more recipients.
Actions for Google Chronical
Lucidum includes the following Actions for Google Chronicle:
Send Data. Sends a custom set of Lucidum data to Google Chronicle.
Actions for HappyFox Help Desk
Lucidum includes the following Actions for HappyFox Help Desk:
Create HappyFox Ticket. Create or update a ticket in HappyFox. The HappyFox action can customize the category, subject, message, and other fields.
Create HappyFox Asset. Map Lucidum data to asset data in HappyFox Help Desk.
Actions for Hunters
Lucidum includes the following Actions for Hunters:
Send Data. Sends a custom set of Lucidum data to Hunters.
Actions for Jira Cloud Platform
Lucidum includes the following Actions for Jira Cloud:
Create Jira Issue. Creates a Jira issue. For each record that matches the base query, the output fields are attached to the Jira ticket.
Actions for Microsoft Defender
Lucidum includes the following Actions for Microsoft Defender:
Isolate Machine. Disconnects one or more devices from the network while retaining connectivity to the Defender for Endpoint service, which continues to monitor the device.
Unisolate Machine. Reconnects one or more devices to the network.
Devices that are behind a full VPN tunnel won't be able to reach the Microsoft Defender for Endpoint cloud service after the device is isolated. Microsoft recommends using a split-tunneling VPN for Microsoft Defender for Endpoint traffic.
Actions for Microsoft Sentinel
Lucidum includes the following Actions for Microsoft Sentinel:
Send Data. Sends a custom set of Lucidum data to Microsoft Sentinel.
Actions for Microsoft Teams
Lucidum includes the following Actions for Microsoft Teams:
Post on Teams. Sends a custom set of Lucidum data to Microsoft Teams.
Actions for Opsgenie
Lucidum includes the following Actions for Opsgenie:
Create Alert. Send an alert from Lucidum to Opsgenie. Opsgenie will deliver the alert according to its policies.
Actions for Rapid7
Lucidum includes the following Actions for Rapid7:
Create a New List of IPs/Hosts for Scanning. Send a list of IPs/host names to Rapid7 for scanning.
Actions for ServiceNow
Lucidum includes the following Actions for ServiceNow:
Create ServiceNow Assets (IRE API). Creates one or more new configuration items (CIs) in ServiceNow.
Create/Update ServiceNow Assets (IRE API). Creates one or more new configuration items (CIs) in ServiceNow. If the one or more of the CIs already exist, this action updates the existing CIs.
Actions for Slack
Lucidum includes the following Actions for Slack:
Post on Slack. Sends data (outputfields) from the specified records (from the base query) to a slack channel.
Actions for Splunk
Lucidum includes the following Actions for Splunk:
Send Data. Sends a custom set of Lucidum data to Splunk.
Actions of Sumo Logic
Lucidum includes the following Actions for Sumo Logic:
Send Data. Sends a custom set of Lucidum data to Sumo Logic.
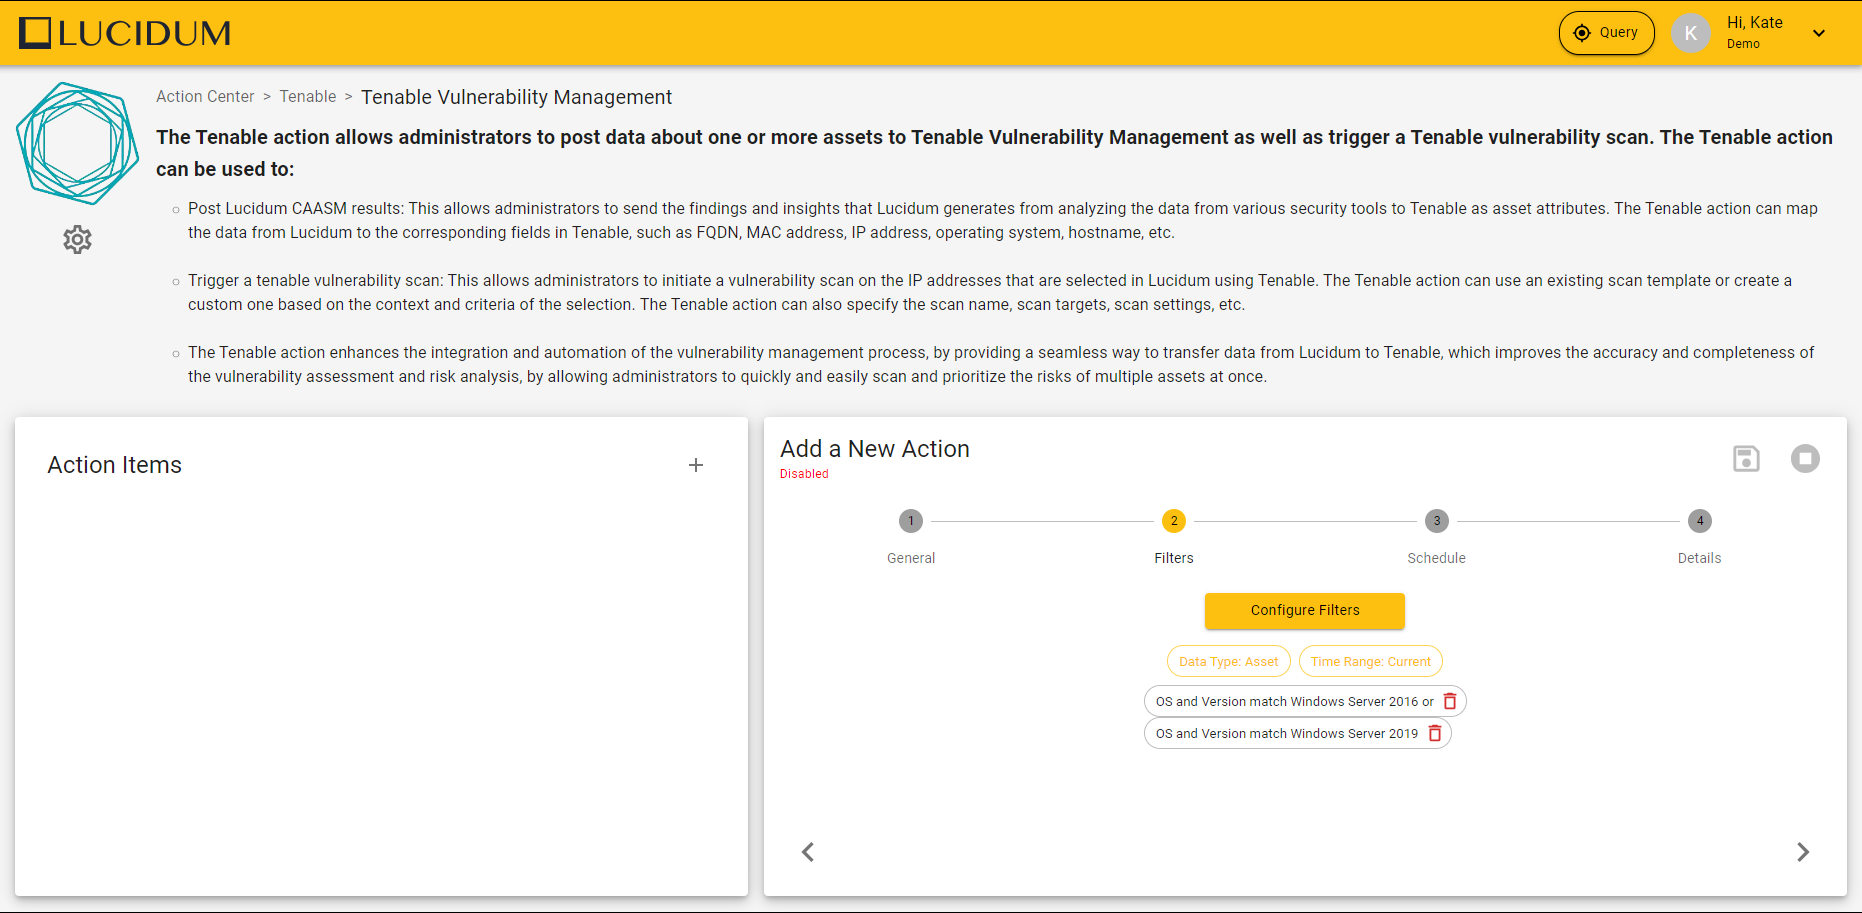
Actions for Tenable Vulnerability Management
Lucidum includes the following Actions for Tenable Vulnerability Management:
Send to Tenable Vulnerability Management Assets. Sends a custom set of Lucidum data to Tenable Vulnerability Management to import as assets.
Launch Tenable Vulnerability Management Scan. Launches a scan in Tenable Vulnerability Management with a specified list of assets.
Add to Tenable Vulnerability Management Target Group. Adds a list of assets to a target group in Tenable Vulnerability Management . A target group includes a list of targets to scan.
Workflow for Creating Configurations and Actions in Lucidum
To create a new configuration:
Choose Action Center from the left pane.
In the Action Center, choose from the action types in the Categories pane or click on an icon in the right pane.
To create a configuration for the action, click the Configuration (gear) icon. A configuration provides the connection and authorization information to communicate with the external solution.
In the Manage Action Configurations page, you can either click the Add Configuration icon (plus sign) or edit the Default configuration by clicking the Edit icon (pencil).
In the Manage Action Configurations page, supply values in the fields.
Save the configuration.
Click the Configuration (gear) icon.
In the Manage Action Configurations page, find your new configuration. Click its Test icon (page with checkmark) to test authentication and the connection.
To create a new action:
Choose Action Center from the left pane.
In the Action Center, choose from the action types in the Categories pane or click on an icon in the right pane.
To create an action, click the Create New Action (+) icon in the Action Items pane. An action specifies the task to execute, the data to include in the action, and how frequently to execute the action.
Lucidum displays the Create a New Action page.
Provide values in each page and click the Next (>) icon.
Save the action.
Lucidum automatically executes the action at the time and recurrence you defined in the action.
You can apply an existing configuration to more than one action. If a configuration already exists, you might be able to re-use the existing configuration and might not need to create a new one.
Workflow Using Clone to Create a New Action
Choose Action Center from the left pane.
In the Action Center, choose from the action types in the Categories pane or click on an icon in the right pane.
To clone an action, in the Action Items pane, find the action you want to clone and click the clone icon (two pages). An action specifies the task to execute, the data to include in the action, and how frequently to execute the action.
Lucidum displays the Clone Action page.
Provide a new name in the Action Name field.
Edit one or more values in one or more pages and click the Next (>) icon.
Save the action.
Lucidum automatically executes the action at the time and recurrence you defined in the action.
You can apply an existing configuration to more than one action. If a configuration already exists, you might be able to re-use the existing configuration and might not need to create a new one.
Alternative Workflow for Creating an Action
You can also create an action when viewing the results of a query. To do this:
Create a query from the Query button. For details, see the chapter on Creating Queries.
Click the Show Results (checklist) icon to open the Query Result page
The Query Results page displays a the results of query.
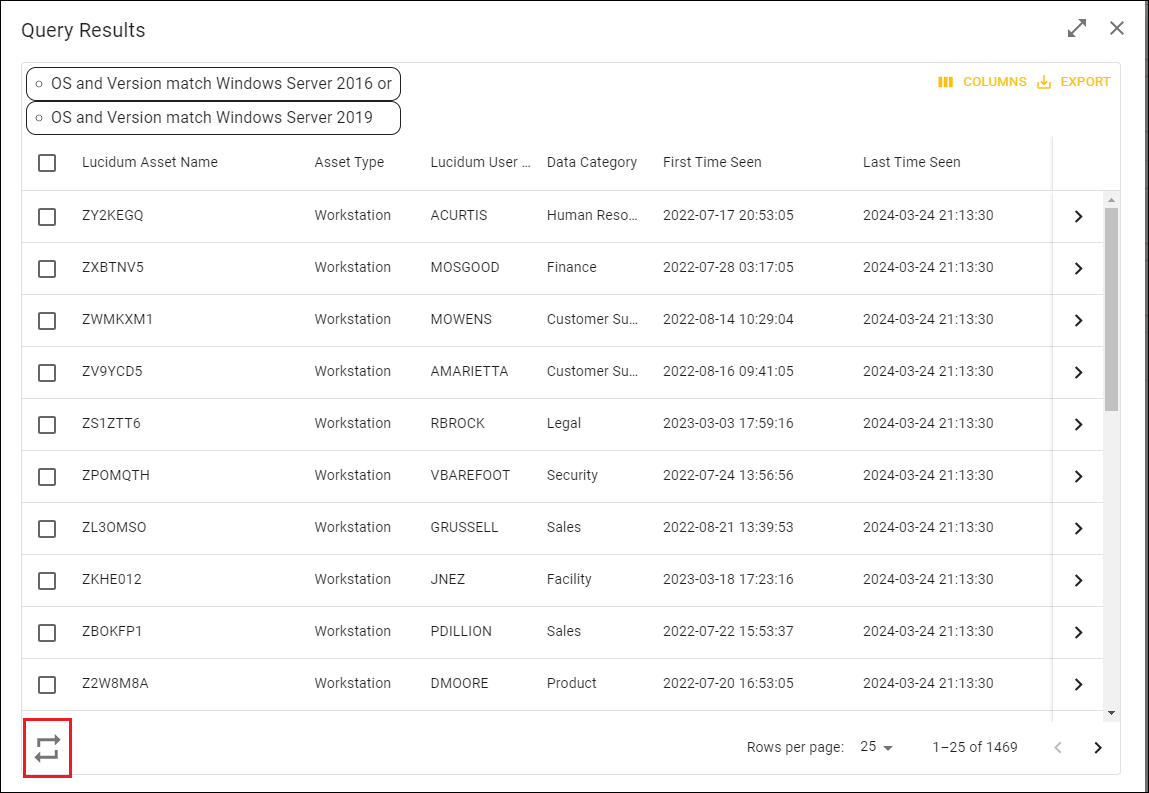
In the Query Results page, click the Create a recurring action (arrows) icon.
In the Send to Action Center page, select an action type.

Lucidum displays the Create a New Action page, with the query already loaded in the Filters page.
Workflow for Editing a Configuration
To edit an existing configuration , follow these steps:
Choose Action Center from the left pane.
In the Action Center, choose from the action types in the Categories pane or click on an icon in the right pane.
To edit a configuration, click the Configuration (gear) icon.
In the Manage Action Configurations page, find the configuration you want to edit and click its Edit (pencil) icon.

You can edit one or more fields in the configuration.
Click Save to save your changes.
Workflow for Editing an Action
To edit an existing actions, follow these steps:
Choose Action Center from the left pane.
In the Action Center, choose from the action types in the Categories pane or click on an icon in the right pane.
in the Action Items pane, find the action you want to edit. Click its Edit (pencil) icon.

You can edit fields in the General page, the Filters page, the Schedule page, or the Details page.
Click the Save Profile (disc) icon to save your changes.
Viewing Information About an Existing Action and Executing an Action On-Demand
To view information about an existing action:
Choose Action Center from the left pane.
In the Action Center, choose from the action types in the Categories pane or click on an icon in the right pane.

The Action Items pane displays the following icons for each action:
One Time Action (arrows with “1”) icon. Specifies that the action is executed once upon creation.
After Data Ingested (calendar) icon. Specifies that the action is executed each time Lucidum ingests data, either every 24 hours or on demand.
Recurrence (arrows) icon. Specifies that the action is executed on a schedule.
Edit (pencil) icon. Allows you to edit the action.
Send Now (paper airplane) icon. Executes the action on-demand.
Disabled (read circle) icon. The action is not currently active.
Enabled (green circle) icon. The action is executed at the specified interval (either after ingestion or on a schedule)
View Logs (page) icon. Allows you to view logs about each execution of the action.
Delete (trash can) icon. Deletes the action.
Action Logs
You can view general logs and detailed logs about each Lucidum actions.
To view these logs:
Choose Action Center from the left pane.
In the Action Center, choose from the action types in the Categories pane or click on an icon in the right pane.
In the Action Items pane, select the View Logs icon.
The Action Logs modal page appears:

The Action Logs modal displays:
Status. Specifies whether the last execution of the action was successful (green) or failed (red).
Triggered At. The date and time the action was last triggered.
Records. Number of records included in the action.
Actions. Download the log file for the last execution of the action.
To download a detailed log file for an execution of the action, click on the icon in the Actions column.
Lucidum downloads a .csv file to your local computer. The .csv file includes the payload for the action. You specify this payload in the Output Fields field of the action.
An example log file looks like this:

This action found nine assets that match the Filter in the Filters page.
For each of those assets, the action sent the values from the fields specified in Output Fields in the Details page to Tenable Vulnerability Management . In our example, the fields in the payload are Data Sources, First Time Seen, IP Address, Last Time Seen, Lucidum Asset Name, and Lucidum User Name.
Action Limits in Lucidum
Each action can include up to 5,000 records.
You can trigger actions to run as frequently as every 5 minutes.