
Using Connectors
Connectors allow Lucidum to ingest data from your environment and discover, identify, and classify assets, data, and users.
Lucidum includes pre-built connectors for the most commonly used solutions for security, vulnerability scanning, cloud, data warehouse, identity management, logs, network, endpoint management, IP management, file sharing, and devops.
To configure a connector, you provide credentials that allow Lucidum secure, read-only access to a deployed solution.
Viewing the List of Connectors
To view the list of Connectors on your version of Lucidum:
Navigate to the Lucidum UI
In the left pane, click the Connectors icon.
In the Connectors page, you can view the list of connectors.
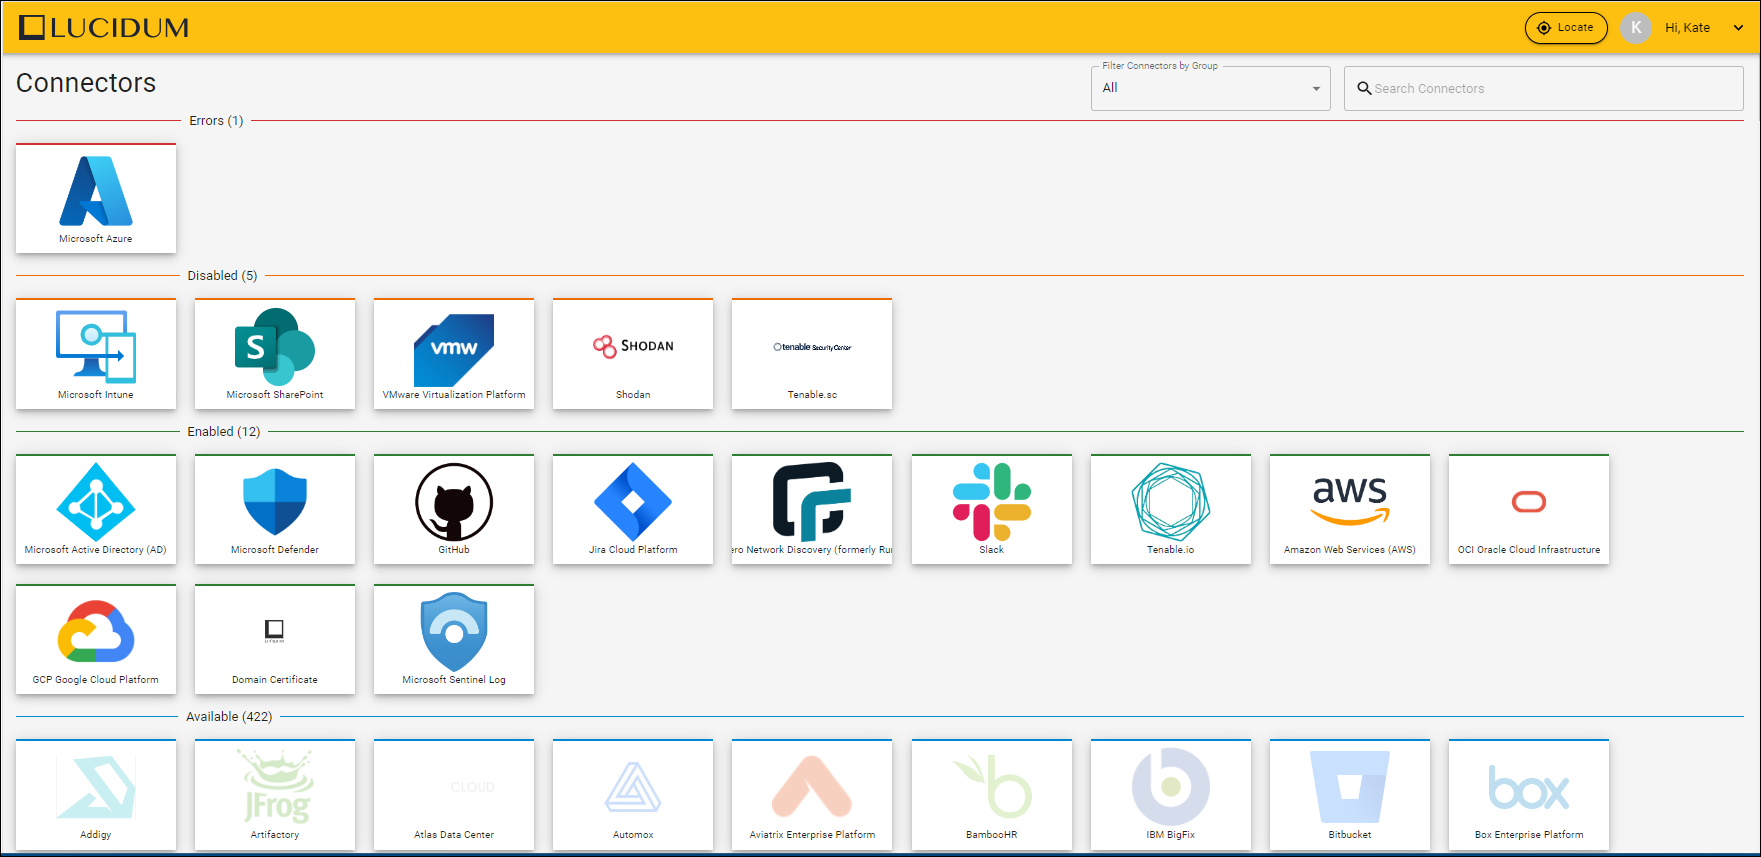
The connectors are categorized as:
Errors. These connectors that have been configured for use but have errors connecting.
Disabled. These connectors that have been configured for use but are currently disabled.
Enabled. These connectors that have been configured for use and are currently in use.
Available. These connectors have not been configured for use.
You can use the Filter Connectors by Group field in the upper right to view connectors by categories like Cloud Security, Application Management. Identity Access Management.
Viewing the Status of a Connector
To view the status of a connector:
Navigate to the Lucidum UI
In the left pane, click the Connectors icon.
In the Connectors page, you can view the list of connectors.
The connector categories provide a high-level status of each connector.
The connectors are categorized as:
Errors. These connectors have been configured for use but have errors connecting.
Disabled. These connectors have been configured for use but are currently disabled.
Enabled. These connectors have been configured for use and are currently in use.
Available. These connectors have not been configured for use.
When you find the connector you want to view, click on its icon.
The Settings page appears.
If the connector has a red icon in the upper right, it is disabled.
If the connector has a green icon in the upper right, it is enabled.
To get immediate information about a connector, you can test the connector.
If the profile is configured correctly, Lucidum displays a list of services that are available with the connector.
If the profile is not configured correctly, Lucidum displays an error message or the message “Services Not Available”.
For detailed logs about your connectors, contact Lucidum Customer Success.
Error Codes for Connectors
API Error Code | General Meanings | Possible Resolutions |
|---|---|---|
400 | Bad Request Error. Usually means that you did not correctly format your API request. | Check the connector documentation. Validate that the connector parameters (for example, URL parameter or API key_ Validate the API payload. You could be missing a query, a field in the request body, or a header field could be wrong. It could also be that some of your request data might have incorrect syntax. |
401 | Unauthorized Error. Usually means you have not successfully authenticated against the API. | Check the credentials (username, password, or API token may be wrong) |
403 | Forbidden Error. The forbidden status indicates that you do not have permission to request that URL. Either your authentication failed or authentication was successful, but you do not have permissions to make the API request. | Check credentials and permissions/scopes. The user name or API token might not have the required permissions/scopes/roles assigned. |
404 | Not Found Error. Indicates that the URL in your request does not exist on the API server. This can also indicate a server problem. | Check the target URL/hostname/IP address. These might not be correct or reachable, or might need a tunnel proxy to access. |
405 | Method Not Allowed. This indicates that the client tried to use an HTTP method (GET, POST, PUT, DELETE) that the resource does not allow. For example, a read-only resource might not support POST, and a controller resource might allow GET and POST, but not PUT or DELETE. | Check the source API documentation and make sure the connector is using the correct request method. Check the API version. Are you using an older API version that does not support specific methods? Contact Lucidum technical support if you need to downgrade/upgrade your API. Lucidum can check make necessary changes to the connector code. |
406 | Not Acceptable. Indicates that the API is not able to generate the client’s preferred media types, as indicated by the Accept request header. For example, a client request for data formatted as application/xml generates a 406 response if the API formats data only as application/json. | Check the source documentation for the API to find the supported media types. Check the request header for the connector. Make sure the Accept type is supported |
408 | Request Timeout Error. Indicates that API requests have timed out. | Check the target URL/hostname/IP address. These might not be correct or reachable, or might need a tunnel proxy to access. Check the target network connection or tunnel proxy connection if proxy is used. |
415 | Unsupported Media Type. The media-type specified in the Content-type of the request is not supported by the server. | Check the source documentation for the API to find the supported media types. Check the request header for the connector. Make sure the Content-type is supported |
429 | Too Many Requests. Indicates the API requests are too frequent and over the preset limits of the API server. | On the API server, increase the API request limit if possible Contact Lucidum technical support to modify the connector code with API request throttling |
500 | Internal Server Error. Indicates that the API server is not currently accepting requests. | Check that the target URL/hostname/IP address is available. For example, is the server down or in maintenance? Check the settings on the target API server. Look for settings for rate limits, blacklisting, or other settings that may block the connection. Check the connector documentation to ensure you entered the correct information. Check the documentation for the API and check the required format for query fields, body fields, headers, and format. |
501 | Not Implemented. This is is related to the HTTP method (GET, POST, PUT, DELETE) you used to request an URL. Usually, an HTTP request with the wrong method results in a 404 not found status. The Not Implemented” status implies that the method is not supported “yet.” The API creator can use this status to tell the clients that this method will be available to them in future requests. | Check the API version. Are you using an older API version that does not support specific methods? Contact Lucidum technical support if you need to downgrade/upgrade your API. Lucidum can check make necessary changes to the connector code. |
502 | Bad Gateway Error. This error occurs when you use a gateway or proxy server to send requests to the API server. The proxy server then calls the API server in your name. This error indicates that the API server did not send a response. This could be related to a network problem, or simply because the API server crashed, or was down for maintenance. | Check that the target URL/hostname/IP address is available. For example, is the server down or in maintenance? Check the settings on the target API server. Look for settings for rate limits, blacklisting, or other settings that may block the connection. Check target network connection or tunnel proxy connection if proxy is used |
503 | Service Unavailable. Indicates a server error. For example, too many API requests were sent and the API server cannot accept more API requests right now. | Check that the target URL/hostname/IP address is available. For example, is the server down or in maintenance? Check the settings on the target API server. Look for settings for rate limits, blacklisting, or other settings that may block the connection. On the API server, increase the API request limit if possible Contact Lucidum technical support to modify the connector code with API request throttling |
504 | Gateway Timeout Error. This error occurs when you use a gateway or proxy server to send requests to the API server. The proxy server then calls the API server in your name. This error indicates that the API server did not respond before the request was timed out. This error can be related to high network latency between the proxy and the API server. It can also mean that that API server is slow and takes too long to process your request. | Check that the target URL/hostname/IP address is available. For example, is the server down or in maintenance? Check the settings on the target API server. Look for settings for rate limits, blacklisting, or other settings that may block the connection. Check that network connection for the server and for the tunnel proxy connection |
Adding a Connector
To configure a connector for use with Lucidum:
Navigate to the Lucidum UI
In the left pane, click the Connectors icon.
In the Connectors page, you can view the list of connectors.
Look for the connector in the Available category.
When you find the connector you want to add, click on its icon.

In the Settings page, populate the fields in the Create a New Profile pane. This new profile will be the default profile for the connector.
For details on configuring each type of Connector, see the specific page for that Connector.
Testing a Connector
While in the Settings page, you can click the Test Profile (checklist) icon to test the configuration.
If the configuration is correct, Lucidum displays a list of services that are available with the connector.
If the configuration is not correct, Lucidum displays an error message or the message “Services Not Available”.
To test a connector:
Navigate to the Lucidum UI
In the left pane, click the Connectors icon.
In the Connectors page, you can view the list of connectors.
Look for the connector in the Errors, Disabled, or Enabled category. These are connectors that have already been configured.
When you find the connector you want to test, click on its icon.
In the Settings page, in the left pane, select the profile you want to test.
Ensure that the connector is enabled.
Click the text icon.
If testing is successful, you will see a list of enabled services. You can click Enable All Successful Services or individually select services to use.
Editing a Connector
To edit the settings in an already configured Connector:
Navigate to the Lucidum UI
In the left pane, click the Connectors icon.
In the Connectors page, you can view the list of connectors.
Look for the connector in the Errors, Disabled, or Enabled category. These are connectors that have already been configured.
When you find the connector you want to edit, click on its icon.
In the Settings page, in the left pane, select the profile you want to edit.
Edit the fields in the right pane.
Click the Save Profile (disc) icon to save your changes.
Adding an Additional Profile to an Existing Connector
If you want to ingest data from multiple instances of an asset, you can add an additional profile to an already configured connector. To do this:
Navigate to the Lucidum UI
In the left pane, click the Connectors icon.
In the Connectors page, you can view the list of connectors.
Look for the connector in the Errors, Disabled, or Enabled category. These are connectors that have already been configured.
When you find the connector you to which want to add a profile, click on its icon.
In the Settings page, in the left pane, click Create a New Profile.
In the right pane, in the Create a New Profile pane, enter values in the fields.
Click the Save Profile (disc) icon to save your new profile.
To enable the connector, click the Connection Status icon until it shows the green checkmark.
For details on configuring each type of Connector, see the specific page for that Connector.
Deleting a Profile from an Existing Connector
To delete a profile from a connector:
Navigate to the Lucidum UI
In the left pane, click the Connectors icon.
In the Connectors page, you can view the list of connectors.
Look for the connector in the Errors, Disabled, or Enabled category. These are connectors that have already been configured.
When you find the connector you to which want to add a profile, click on its icon.
In the Settings page, in the left pane, find the profile you want to delete and click its Delete (trash can) icon.
Configuring a Connector to Use a Proxy Server
A proxy server allows Lucidum connectors that run on your SaaS account to fetch data securely from your on-premises assets.
Navigate to the Lucidum UI
In the left pane, click the Connectors icon.
In the Connectors page, you can view the list of connectors.
Look for the connector in the Errors, Disabled, or Enabled category. These are connectors that have already been configured.
In the Settings page, scroll down the field in the right pane. If the connector supports a proxy, it will include the Proxy field.
Enter the following in the Proxy field:
192.168.255.6:3128
This is the IP address and port number of the proxy service inside the docker container on the proxy server.
For more details on configuring a proxy server, see Configuring a Proxy Server.
Start Ingesting Data with a Connector
After you have successfully configured a Connector, you can immediately start ingesting data with that Connector. To do this:
NOTE: Lucidum automatically ingests data from all Connectors once a day, at midnight.
Navigate to the Lucidum UI
In the left pane, click the Connectors icon.
In the Connectors page, you can view the list of connectors.
Look for the connector in the Errors, Disabled, or Enabled category. These are connectors that have already been configured.
When you find the connector you want to enable, click on its icon.
In the Settings page, in the right pane, click the Connection Status icon until it shows the green checkmark.
Click the Save Profile (disc) icon to save your changes.
Stop Ingesting Data from a Connector
You can pause or permanently stop ingesting data with an existing Connector. To do this:
Navigate to the Lucidum UI
In the left pane, click the Connectors icon.
In the Connectors page, you can view the list of connectors.
Look for the connector in the Errors, Disabled, or Enabled category. These are connectors that have already been configured.
When you find the connector you want to disable, click on its icon.
In the Settings page, in the right pane, click the Connection Status icon until it shows the red square.
Click the Save Profile (disc) icon to save your changes.